MP4 is the most common file type, so converting your video to MP4 in H.264 or H.265 will easily allow you to share your content with all your online audiences.

ApowerShare Video Joiner & Converter not only can merge video into large MP4 video files, but also can convert videos from MKV to MP4, MOV to MP4, AVI to MP4, FLV to MP4, and convert MP4 video files to AVI, MKV, WMV, MOV, FLV, WEBM and more.

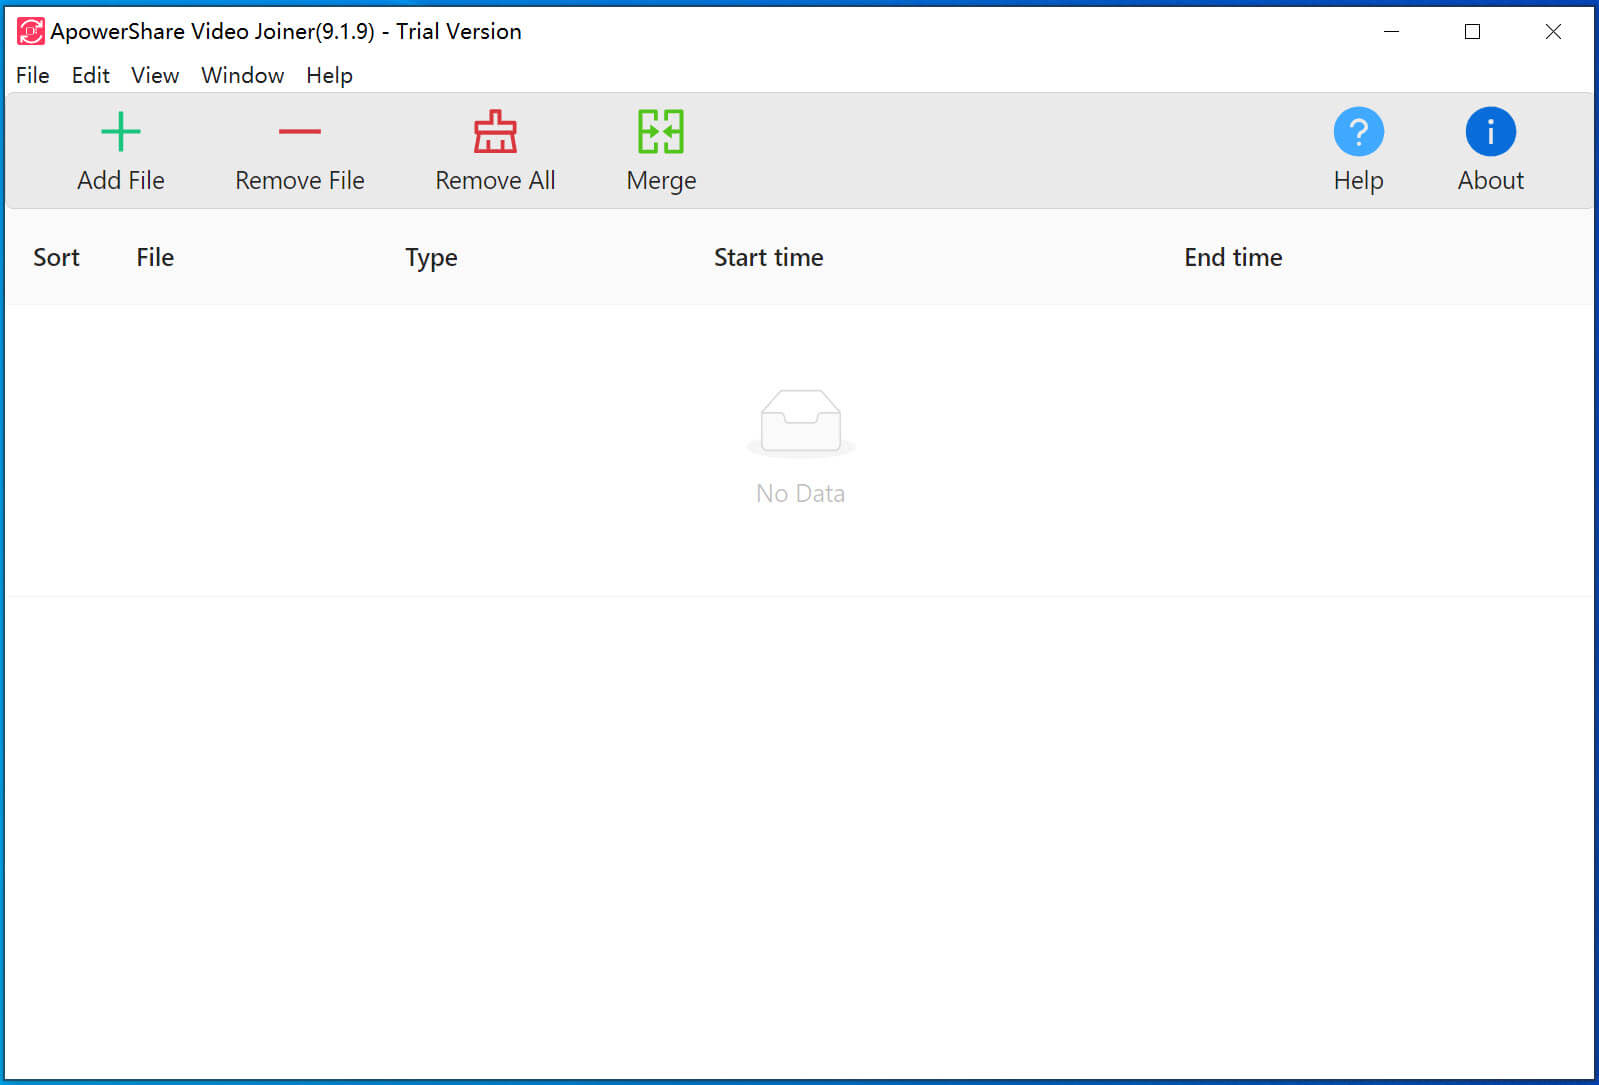
STEP 1. Launch ApowerShare Video Joiner & Converter

Launch the ApowerShare Video Joiner & Converter on your computer, you can see below main interface.

STEP 2. Add a Video File to the Program

Just click “Add File” to locate the a file you want to convert from your hard drive, then click Open to add them to the conversion queue.

Tips: To change video format by using this software, we suggest you add a video file only. If you add two, three and more video files at batch, all added video files will be merged into one file. Of course, if you want to merge multiple video clips and change video format, you can do so.

STEP 3. Click Merge Button and Choose a New Format

In the top portion of the interface, click “Merge” button and choose the desired output format for your video. You can locate the appropriate preset using the search box or browse the Video, Devices, and Audio tabs.

For example, as below screenshot, you can convert video to MP4 for playing on mobile phone, such as iPhone, iPad, Android, and more devices.

Tips: You can click “advanced” options to get more output profile settings.

STEP 4. Start the Video Conversion

Click “Merge” in the top right corner to start the encoding process. When the file is ready, the folder with the output file will open automatically.

Great! Now you know how to convert a video format in a couple of clicks.

Part 2. How to Record Audio from Application on Mac


Once you have installed ApowerShare Audio Recorder and consider getting started to record audio from any application on Mac (QuickTime, iTunes, Safari, Firefox, Chrome, Skype, iChat, Music Player, and other application, follow the guide below to process the simple audio/music recording without hassle!

STEP 1. Launch ApowerShare Audio Recorder

Launch the ApowerShare Audio Recorder on Macbook/iMac, you can see below main interface.

STEP 2. Add Application to Record Audio From

Then, please clicking “Application” button to add any app that you want to record audio from, you can add browser such as Safari, Firefox, Chrome; or media player app such as QuickTime, iTunes, VLC; or streaming music app, such as Apple Music, Spotify, YouTube Music, Amazon Music, Pandora Music, Deezer, Napster, Tidal, etc; or chat app such as Skype, iChat, FaceTime, Wechat, QQ, etc.

STEP 3. Play Video/Audio in App/Browser and Start Recording

Please open the app that you want to record from. Here, let’s take recording audio from QuickTime as example. Please open a video in QuickTime, then go back to the Audio Recorder and click the left “Record” icon, just clicking “Play” icon on QuickTime Player start to play a video, the Audio Recorder will detect this action and start to record audio automatically from QuickTime.

STEP 4. Stop or End Audio Recording

Duding recording process, you can click the left “Stop” icon to stop recording process, or clicking the right “End” icon to end the whole recording process.

STEP 5. View Audio Recording History

To view all recording history, please click “Recording Bin” menu, you can play them directly with it’s built-in media player. To get the recorded MP3 files, please click “Reveal” button to open the output folder, you will get the MP3 audio files.

Tips: There is a built-in Audio Editor in the software, please clicking “Edit” icon to launch the editing interface.

Part 3. How to Edit the Recorded Audio Files


ApowerShare Audio Recorder also provide a powerful Audio Editor, you can use the audio editing functions to cut and splice audio clips on your Mac in to your own unique track.

STEP 1. Launch Audio Editor

To launch it’s built-in audio editor, please open recording bin interface to view all of your audio recorded history. Please select a recorded audio that you want to edit, then click “Edit” icon to launch the Audio Editor.

STEP 2. Start to Edit Audio

With it’s built-in Audio Editor, you can easily to cut down your recordings by setting the start and end points. You also can cut and splice audio clips in to your own unique track.

Part 4. Record Audio from Other Application (Screenshot)


ApowerShare Audio Recorder support to record any audio from any application on your Mac, it’s very easy to use. With this Mac audio recorder, you can record audio from Chrome, Safari, Firefox, and other browser, so you can play music or video online via browser, then use our software to grab audio clips from your favorite videos on sites such as YouTube and Vimeo on Mac.

Record audio from Chrome

Record audio while playing a video

Record audio from QuickTime while playing a video

Record audio while playing a video on Mac

Record and extract audio from video